Tutorial (Data "beaconization")
Note
If your data is already serialized to JSON format (the BFF), you can go directly to STEP 4.
In this tutorial it is expected to already have the Data ingestion tools and Beacon V2 REST API downloaded, installed and set up following the instructions in Download & Installation.
Let's start by the simplest case. Imagine that you have:
- Metadata (including phenotypic data) in your system, labelled according to your internal nomenclature.
- A VCF file.
Previous steps
Connect to the container
The beacon container is running in detached mode or in the background. To connect, you should invoke from your terminal:
docker exec -ti beacon2-ri-tools bash
Important
If you need to copy your data inside the beacon2-ri-tools container you can use the next command outside the container or create a mounted volume between the container and the host machine.
Then:
docker cp your_data.vcf.gz beacon2-ri-tools:/your_data.vcf.gz
Note
The container_name, is the id of the container itself. To know it you can type docker ps and look for the name of the container. This tutorial could be different depending on the method of installation (method 1: deploy_beacon-ri-tools_1 / method 2: beacon-ri-tools).
To see all the running container names, execute the next command:
docker ps -a
Now you should be inside the beacon2-ri-tools container to start the Data beaconization.
STEP 1
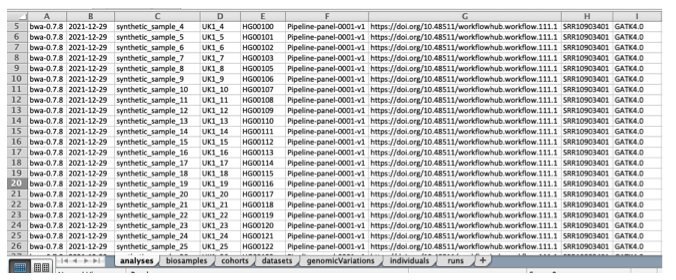
First, we are going to convert your metadata (sequencing methodology, bioinformatics tools, phenotypic data, etc.) to the format of the Beacon v2 Models. As input, we will be using this XLSX template.
About the XLSX template
The XLSX template consists of seven sheets that match the Beacon v2 Models.
The template has the purpose of facilitating users' transformation of the data (likely in tabular form) to the hierarchical structure that we have in the Beacon v2 Models.
The header nomenclature gives a hint about if the data will be later stored as an object (naming contains .) or as an array (naming contains _).
Each column has its own format (e.g., string, date, CURIE). These formats can browsed in the documentation.
We recommend using the provided XLSX for the synthetic data as a reference.
The first thing you need to do is manually map/convert your metadata to match the syntax of the provided XLSX file, ensuring you fill it out accurately.
Note
Normally, people don't fill out the sheet (tab) named genomicVariations as this info will be taken from the annotated VCF (see STEP 2).
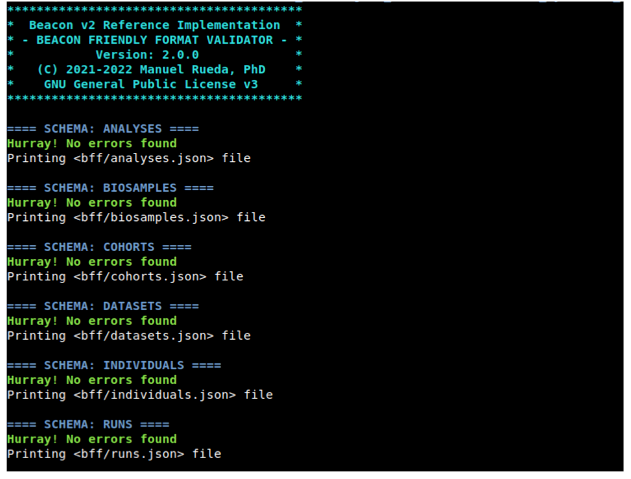
Once you have completed filling out the Excel file, you can proceed to validate it. At this stage, it’s common to have uncertainties about your mapping to Beacon v2 syntax. Luckily, the B2RI utility bff-validator is there to assist you with this task. The validator ensures that all values in the XLSX file conform to the specifications outlined in the Beacon v2 Models default schemas. Technically, this process is referred to as validating data against JSON Schemas.
./utils/bff_validator/bff-validator -i your_xlsx_file.xlsx --out-dir my_bff_dir
When you run it, it's highly probable that you'll encounter errors or warnings related to your data. The bff-validator tool is designed to detect these errors and provide explanations for the validation failures. Please ensure to address all the issues within the XLSX file. Feel free to run the script as many times as needed. :-)
Example Errors
Example 1:
Row 1:
/ethnicity/id: String does not match ^\w[^:]+:.+$.
This error indicates that the id within ethnicity does not conform to the CURIE convention. The expected format is a string that matches the specified regular expression.
Example 2:
Row 1:
/id: Missing property.
This error suggests that the id attribute is missing for the individual in question.
Example 3: (Non-error)
As the specification is currently under development, warnings may appear for fields that appear correct. An example is the oneOf error, as shown below:
Row 1:
/diseases/0/ageOfOnset: oneOf rules 0, 1 match.
About Unicode
Unicode characters are permitted as values in cells. However, be cautious when copying and pasting from external sources, as this can introduce unexpected characters in unintended places. If the bff-validator generates errors that are difficult to diagnose, consider using the --ignore-validation flag to proceed and then examine the generated JSON files for errors. After identifying and correcting the errors in the original Excel file, rerun the validation process without the --ignore-validation flag. For more detailed information, please visit this page.
At some point, you won't encounter any validation errors. By then, the script should have generated 6 text files, which we refer to as the Beacon Friendly Format. These files are in JSON format (specifically, JSON arrays) and will be utilized later in STEP 3.
Congratulations! Now you can go to STEP 2.
STEP 2
Now that you have processed the metadata, it's time to process the VCF file.
About VCF types
Currently, the B2RI only handles VCFs coming from DNAseq experiments (e.g., WES, WGS, gene panels, etc.). The VCFs can be either single or multisample.
As of this writing, structural variants in VCF files are not being parsed. (There is a Scout working group currently developing Beacon v2 specifications for structural variants.) We hope to implement this feature in future versions. Copy Number Variations are not supported. The variation property uses the LegacyVariation sub-property.
The VCF file has to be gzipped (or bgzipped). What we are going to do it's to annotate it (or re-annotate it if your file already has annotations) with SnpEff and SnpSift and transform the format so that it becames the 7th BFF file (i.e., genomicVariationsVcf.json).
./beacon vcf   -t 1    -i input.vcf.gz -p param_file
     |      |      |         |              |
     exe    mode   #threads   <vcf>           parameters file (optional)
Here we are using beacon script in mode vcf. This mode is one of the three available [vcf|mongodb|full].
The parameters file is optional if you want to use the default value (hg19) but it is needed if you want to change them. Note that you must provide the reference genome (unless you're using hg19 which is the default one) that was used to create your VCF. See all the script options here.
The param_file (YAML) should look something like this:
---
genome: hs37
If you want to create an HTML file to be later viewed with the BFF Browser utility your YAML file should look like this:
---
genome: hs37
bff2html: true
Important
Note about timing: We made the script as fast as we possibly could with a scripting language. In this regard, the processing time scales linearly with the #variants, but it's also affected by the #samples. For instance, 1M variants with 2,500 samples will take around ~20-25 min.
If something is wrong with the input files, the script will complain and provide possible solutions.
![]()
Once completed, you will end up with a dir like this one beacon_XXXXXXX/vcf. Inside, you will find genomicVariationsVcf.json.gz, the 7th BFF file.
About disk usage
During the annotation process, multiple intermediate VCF files are created (and kept). They're all compressed, but still they will be as big as your original VCF. On top of that, genomicVariationsVcf.json.gz file can be huge. In summary, please allocate up to 10x times the space of your original VCF. Feel free to erase the temporary VCF files beacon_XXXXXXX/vcf/*vcf.gz once the job is completed.
Now that you have the 7 JSON files it's time to go to the STEP 3.
STEP 3
The objective of this step is to load (a.k.a. ingest) the 7 JSON files into MongoDB. Once loaded in MongoDB, they are named collections.
For doing this we will use again beacon script, but this time in mode mongodb.
Let's assume that we have the 6 files from STEP 1 in the directory my_bff_dir and the file from STEP 2 at beacon_XXXXXXX.
We will add these values to a new parameters (YAML) file:
---
bff:
  metadatadir: my_bff_dir
  # You can change the name of the JSON files
  runs: runs.json
  cohorts: cohorts.json
  biosamples: biosamples.json
  individuals: individuals.json
  analyses: analyses.json
  datasets: datasets.json
  # Note that genomicVariationsVcf is not affected by <metadatadir>
  genomicVariationsVcf: beacon_XXXXXXX/vcf/genomicVariationsVcf.json.gz
Finally, you execute this command
./beacon mongodb -p param_file
     |      |      |
     exe    mode   paramaters file.
If everything goes well, all your data should be loaded into an instance of MongoDB.
![]()
Congratulations! You can now go to the STEP 4.
Note
To exit this container you just need to type "exit".
Using mongoimport for data ingestion
As mentioned in STEP 3, the beacon script in mongodb mode is responsible for loading the data (ingestion and indexing) in MongoDB. You can view the detailed indexing process executed by beacon2-ri-tools here. The system utilizes both single field and text indices. Notably, when new data is introduced to MongoDB, the existing indexes are automatically updated to include this new data.
If you choose to handle data ingestion personally using a CLI tool, the beacon2-ri-tools container provides the MongoDB utility mongoimport for this purpose. Below is an example of how to execute it:
mongoimport --jsonArray --uri "mongodb://root:example@127.0.0.1:27017/beacon?authSource=admin" --file analyses.json --collection analyses
mongoimport --jsonArray --uri "mongodb://root:example@127.0.0.1:27017/beacon?authSource=admin" --file biosamples.json --collection biosamples
mongoimport --jsonArray --uri "mongodb://root:example@127.0.0.1:27017/beacon?authSource=admin" --file cohorts.json --collection cohorts
mongoimport --jsonArray --uri "mongodb://root:example@127.0.0.1:27017/beacon?authSource=admin" --file datasets.json --collection datasets
mongoimport --jsonArray --uri "mongodb://root:example@127.0.0.1:27017/beacon?authSource=admin" --file individuals.json --collection individuals
mongoimport --jsonArray --uri "mongodb://root:example@127.0.0.1:27017/beacon?authSource=admin" --file runs.json --collection runs
mongoimport --jsonArray --uri "mongodb://root:example@127.0.0.1:27017/beacon?authSource=admin" --file genomicVariationsVcf.json --collection genomicVariations
Again, remember that if you follow this alternative path, you will have to index your MongoDB data. Indexes can affect the performance of your Beacon v2 API.
STEP 4
Important
You can ommit the indexing step if you used beacon mongodb to load BFF files into MongoDB.
You can create the necessary indexes running the following Python script.
docker exec beacon python beacon/reindex.py
Fetch the ontologies and extract the filtering terms
This step consists of analyzing all the collections of the Mongo database for first extracting the ontology OBO files and then filling the filtering terms endpoint with the information of the data loaded in the database.
You can automatically fetch the ontologies and extract the filtering terms running the following script:
docker exec beacon python beacon/db/extract_filtering_terms.py
Get descendant and semantic similarity terms
If you have the ontologies loaded and the filtering terms extracted, you can automatically get their descendant and semantic similarity terms running the following script:
docker exec beacon python beacon/db/get_descendants.py
STEP 5
Start making queries with the API.
Cheers!
Manu
Note about MongoDB
As with any other database, it is possible to perform queries directly to MongoDB. In our case, the database is named beacon and contains the ingested collections. For doing so, you will need to use one of the many UI (we have included Mongo Express), the mongosh or use any of the MongoDB drivers that exist for most programming languages. As an example, we have included an utility bff-api that enables you to make simple queries (see instructions here). For a more comprehensive description check MongoDB literature.